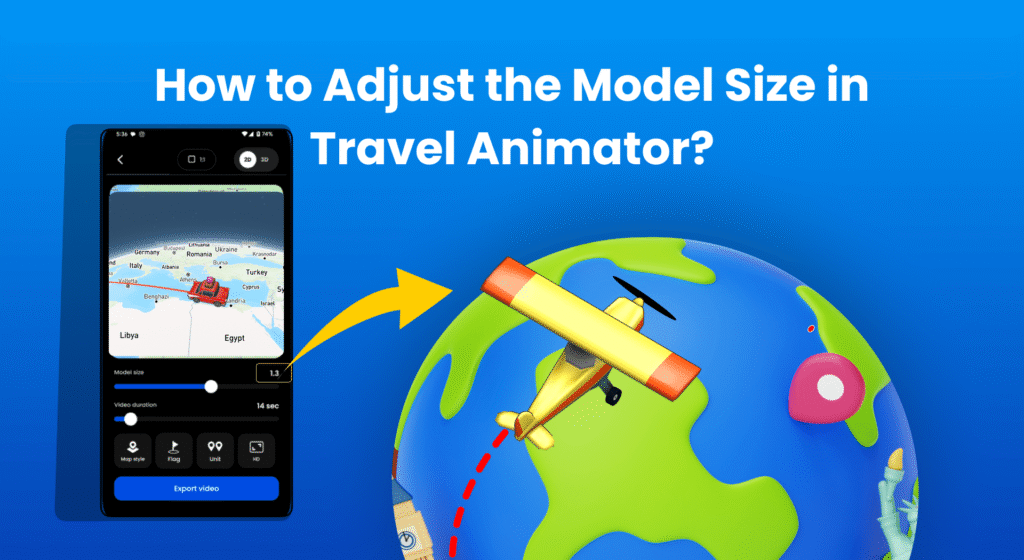
Travel Animator offers an option to adjust the model size, so you can make the animation clean and professional.
You are creating your travel video using Travel Animator. You travel in a different vehicle at each destination, so you want to highlight the travel models in the video. After previewing your video, the transporting model looks too small, and you want to increase its size a little bit. But you don’t know how to improve the model size.
This will guide you through adjusting the model size and creating a proper size for your travel animation videos.
What is a Model and its Size in Travel Animator
In Travel Animator, the model represents the visual representation of the travel element, such as cars, bikes, planes, humans, ships, etc. This moving model makes the animation engaging and visually appealing.
Model size is the size of the moving transporting element in Travel Animator. It controls how big or small a model looks in the animation. A model that’s too large can cover routes and other visuals, while a small one is not visually clear. So Travel Animator lets you adjust the model size that is perfect for your animation video.
Steps to Adjust the Model Size in Travel Animator
- Open the Travel Animator and complete your project by adding destinations, models, images, and labels.
- Preview your video and adjust the model size using the “Model size” option located at the bottom of the video preview.
- After adjusting the model size, set up other features like ratio, video duration, map style, flag, etc.
- Once the animation is finished, export the video in HD or 4K quality. Upgrade to Travel Animator Pro for 4K quality export.
- Share your animation video directly to different platforms.
Tips to Make the Animation Clean and Professional
- Use different models for different routes. Use a person icon if it is a walking trip. Use a plane if it is a flight trip. This makes the story clean and visually relevant.
- Always preview the video and resize the model so it doesn’t cover the route or be visually unclear.
- Choose the model that stands out against the background map style. It will affect the visibility if the map and model colors are similar.
- Changing the model too frequently makes the video congested and distracting. It’s better to stick with one model type for each destination within a single route.
Mistakes to Avoid While Adjusting the Size
- Oversizing the model can block essential parts of the map, making it complicated.
- Undersizing the model size might not be visible at all, especially on a mobile screen.
- Not checking your preview video can result in bad sizing and positioning.
- Different video ratios need different model sizes, so using the same size for different platforms causes the model to look too small or too big.
Ready to Make Your Travel Video Professional?
Adjusting the model size is a small step, but it has a significant role in making your travel video clean and professional. By following the right tips and utilizing each feature, you can create a travel animation that not only engages with the audience but also tells your travel story effectively. Explore Travel Animator Pro for advanced features.